top of page

Installation Guide
Check out how easy FloorLock™ is to install.
The adjustable FloorLock brace was designed to be simple and effective for both Building Contractors and DIY Home Renovators.
Quick Summary of the 6 Installation Steps

STEP 1: Apply temporary support to level the floor
STEP 2: Secure the end joist to the wall
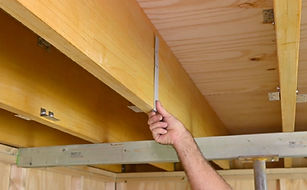
STEP 3: Use template to set out the mounting brackets

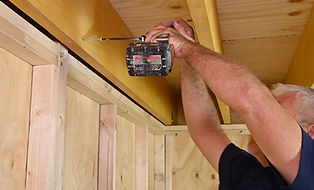
STEP 4: Fix mounting brackets to joists
STEP 5: Postition AFB inside mounting brackets

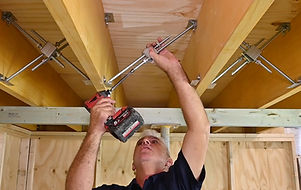
STEP 6: Tension the AFB in the sequence shown below, from the outside joists to the centre joist
FAQ's
Questions Frequently Asked
Yes, the Adjustable FloorLock Bracing (AFB) system was designed to work for both situations, and for various joist sizes and types. Specifically, dimensional lumber joists and I-Joists. The ideal range of widths between joists that work perfectly with the AFB is 8 to 14 (inches).
The AFB can be used in a new construction to re-enforce the new floor for heavy loads areas, eg, under a heavy bath or spa, under a heavy stone topped kitchen island etc. And in existing floors, it can be used to strengthen, reinforce and level out an existing floor that’s sagging, prevent movement in bouncy floors, as well as quieten squeaky floors.
The one Adjustable FloorLock Brace (AFB) can be used in two ways. As a X cross brace, or as a passthrough brace.
The passthrough brace method would be used to allow services, such as, sewer pipes, air-conditioning ducts or wiring to passthrough between the joists. The AFB is designed to transfer loads across structural elements, ensuring stability, and distributing weight efficiently while still offering the additional support and reinforcement required for heavy loads areas. Whether it’s installed as a X cross brace or a pass-through brace it will lift a sagging floor, as well as reduce movement and bounce in a floor.
Yes, The Adjustable FloorLock Brace (AFB) can be used to reinforce heavy load areas, such a built-in BBQ area on a timber deck or patio.
Please note that all deck and patio joists that the AFB is being applied to will need to be secured together from below to stop the joists from spreading under the tension of the AFB being used to re-enforce the floor area. Using a metal strap to tie joists together will prevent them from spreading due to the force exerted by the AFB tensioning.
No, the Adjustable FloorLock Bracing (AFB) system is designed to be DIY and user-friendly. It can be installed by homeowners with basic tools and a general understanding of floor structures. However, if you are not a confident DIYer and don’t have experience of using the tools required, it may be beneficial to contract a professional to install the AFB system. It will still prove to be a more cost-effective method of reinforcing and correcting the usual floor issues it was designed too. Here’s a breakdown to help you decide.
You can install the AFB system yourself if:
• You’re comfortable with DIY projects.
• You have experience with a power driver.
• You understand how to access the floor joists.
• The joists are exposed or easy to access (eg, you’re comfortable using the tools required to open the space required to install the AFB, or the area is in an open basement, or it’s an elevated deck or patio that’s easily exposed during the renovation).
• You’re reinforcing an area with no significant structural issues.
Consider hiring a professional if:
• Significant levelling or rectification is required, and you’re unsure about any of the above.
• Access is limited or difficult (e.g., the joists are behind a finished ceiling in an area that’s hard to reach.
• You’re not comfortable cutting access in the ceiling and reinstalling drywall/plasterboard after installation.
If you’re concerned about potential movement of elements above, like kitchen cabinets and bench-tops, and you want to avoid the complexity of jacking the floor back to its original position, then the Adjustable FloorLock Bracing (AFB) system can provide sufficient tensioning to stabilise the floor and prevent bounce or deflection without needing to raise the floor.
The AFB works by applying tension across the floor framing, helping to keep the joists properly aligned and resist the movement that would otherwise cause sag or bounce under the load. This can effectively control the structural behaviour of the floor without requiring you to adjust the height or risk shifting anything above.

bottom of page